Hey ,
So far I have colored the Anthro croc . I used photoshop to do the painting . Here I have done the base color mehndi(heena ) green colour first and then used brush tool to make the scales . Then used FX option in which I used Bevel and emboss drop shadow , colour burn and other option to get the desired effect on the scales to show the maximum details . This technique was really helpful and different then the usual just painting with brushes .Below is the black and white sketched and the colored image of the character
Sorry for the late update
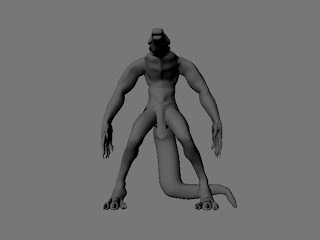
But , I have also done the base mesh of the character using Autodesk maya
Below is the WIP
here is the base mesh of the character
I used basic cylinder- block modelling method for the complete body and tail .
And for the head base mesh I used patch method which was tricky to figure out the starting point but finally managed to do it by self learning various tutorials .Below is the basic process I went through to build the basic head mesh
Reference for modelling base head mesh :
I used the above
reference image to create the
base mesh of the head . This was one of
the difficult part to figure out the starting point and which method to use as I have never modelled an animal head before , I
always find block method to be bit tricky and patch method goes easy for head
modelling . So I wanted to use patch method for this as I have used the same for the human heads too . I went online to
see reference tutorial for crocodile head modelling . But , I could only find
block modelling method which was not even easy to grasp . So I further used all
the basic techniques and found my way through patch modelling method .
Procedure : Starting point
I started modelling from the side view as this view looked
appropriate to start with , I used a plane polygon and draged it over the side
face of the sketch ,Like shown
below In fig 1 :
Step 2 : Then divided the plane from the side view and also from the front
view by using Edge loop tool and shaping
it according see fig 2 and 3
Then switch to front view
and extruded till other edge and shaping the vertices accordingly (only half side modelling and then mirroring
)
Delete the left side faces of the cube created and neck
opening faces like shown in below
figures
Final result :
Delete the left side faces of the cube created and neck
opening faces like shown in below
figures
That is it ! I have done this so , I feel sorry that due to my ill health I am unable to show much work this week but I am trying all my best to speed up and cover the the week which has left back . But I am very much much happy with the quality of work coming up . There are some errors In the mesh , Like the vertices looked pinched at some area and some edges do not smooth . I will be looking into these problems once I am completely finish with the basemesh . To finish the base mesh all I have to do is one hand , teeth , tongue and eye socket and merging and mirroring. This expected to be finish by the evening tommorow . Once I finish the base mesh , I would be exporting it to the mudbox to do the detailing bit and simultaneously will be doing the clay modelling for entire this week .
Now I can see this project speeding up , hoping for the best .
Thank you, stay tuned .. More updates on the way !